Content Attributes
Windows 7 was released in October 2009 and has gained a lot of fame among users. Especially after the poor acceptance of its predecessor, Windows Vista. It gained traction over time as many decided to go back to XP. Stay and learn in this post how to install Windows 7 on PC using USB.
If you are the one who wants to continue using this system, we have bad news for you. On January 14, 2020, Microsoft decided to end support for this system. This means that Windows 7 will no longer receive updates after that date.
Windows 7 installation requirements: What features should my PC have?
Since there are still people who prefer Windows 7 over other operating systems. For all of them, we have created this article. In which, among other things, we will show you how to install windows 7 on your PC in a very simple way.
Before proceeding with the installation, it is of great importance that you know how this system will work on your computer. You should consider whether your computer has enough space and power to run the software. There are two types of requirements:
- The first has to do with the minimum capabilities of a computer. They are necessary for your work.
- The second relates to what your computer must have in order to function smoothly and without complications.
Let’s see what each of them is:
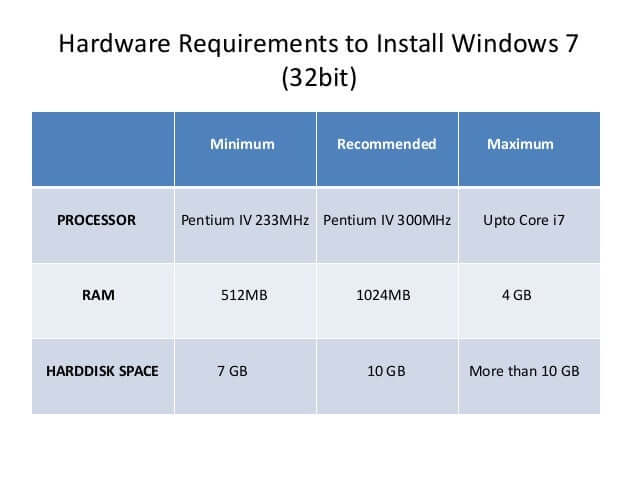
Minimum requirements for installation
On a computer with a 32-bit processor architecture :
- Processor frequency 1 GHz.
- 1 GB of RAM.
- Monitor with a resolution of 800 x 600 pixels.
- Graphics card (can be integrated) compatible with DirectX 9.
- 16 GB of free disk space where Windows is to be installed.
On a computer with a 64-bit architecture:
- Processor frequency 1 GHz.
- 2 GB of RAM.
- Monitor 800 x 600px.
- DirectX 9 compatible video card.
- 20 GB of free space on the main disk.
2- Requirements that are recommended
- Processor frequency 1.55 GHz.
- 1.5 GB of RAM
- Screen resolution 1024×768 pixels.
- DirectX 10 compatible video card.
- 80 GB of free space.
Likewise, Internet access, a CD/DVD optical drive, and an external 512 MB video card are recommended if the computer will be used to install games.
How to install Windows 7 on using a USB stick?
You should know that USB is an installation wizard. Eliminates the need to install a Windows CD or DVD. This option is very handy, especially if your computer or laptop doesn’t have a CD or DVD drive.
This program will serve as a boot disk. That is, Windows will use it to start the system, instead of doing it from the installation on the main disk. To make use of this installation method, you must first obtain:
1- A USB Memory
It is recommended that its capacity is at least 8 GB. It is important to remember that any previous files you had will be lost when the installer starts. That is why, it is better to format it.
2- El Software USB
Since it is free software, you can download it for free from USB.ie. A portable version can be found on the website.
3- Windows 7 .ISO file
It is easy to download. You can find it as a compressed file (like WinRar). Don’t unzip it. Once you have these three elements, you can proceed with the installation. To do this correctly, you need to follow these steps:
4- Run the USB program
When the download is complete, look in the linked file for the USB program followed by the version number. It must have an .exe extension.
5- Insert the USB flash drive into the USB port
Please note that the flash drive cannot be removed during system installation. Choose the disk you just inserted. This can be done in the program window, in the ” Device ” section.
6- Select the .ISO file
Click the ” Select ” button to choose to select the disk image (ISO) in the browser. If you have followed all the steps correctly, the status bar will show ” Ready “.
7- Start transfer
You need to click ” Start ” and the program will convert the files inside the .ISO into a bootable file.
8- Warning window
You have to click ” OK ” on the pop-up window. The program will warn you that the previous data on the USB drive will be deleted. The transfer process may take several minutes.
9- Remove the device
After completing the previous step, you will see a green bar labeled ” Ready “. This means that you can now remove the external device. To do this, you need to open the file explorer, right click on the drive and select ” Eject “. You can then safely remove the flash drive.
10- It’s ready
By following the steps above, you will now have turned your USB drive into a device for installing Windows 7.
Install and configure Windows 7 quickly and easily like a professional
You already have a device capable of installing an operating system via a USB port. It’s time to use it. If you’re going to reinstall or replace Windows, it’s a good idea to back up your important files and documents first.
Let’s go to the details: the steps you must follow to install Windows 7 are these:
1- Turn off your computer.
You must close all windows and programs. Then go to your desktop and press ” Alt + F4 “. In the pop-up window, choose Power off.
2- Insert a USB flash drive into the USB port.
Both the device and the input port must be 2.0. Again, do not remove it until the entire process is complete.
3- Turn on your computer
Press the power button and note the options that appear. It is very important that if you are doing this on a laptop, that you make sure to connect it to the mains to avoid possible interruptions in the process.
4- Enter the Bios menu
The key you need to press to access this window depends on the manufacturer. Maybe it can be Esc, Del, F1, F12, F9. In any case, the system will tell you which one matches your computer. You should note that if you don’t press any buttons, Windows will start normally.
5- Click on the Boot Options tab.
It can also found under the name ” Boot “. Here you have to tell the system the priority to boot from the USB port.
6- Exit BIOS
Press the ” Exit saving changes ” button.
7- Wait a moment
You must be patient, this may take a while. The computer will reboot and begin installing Windows 7.
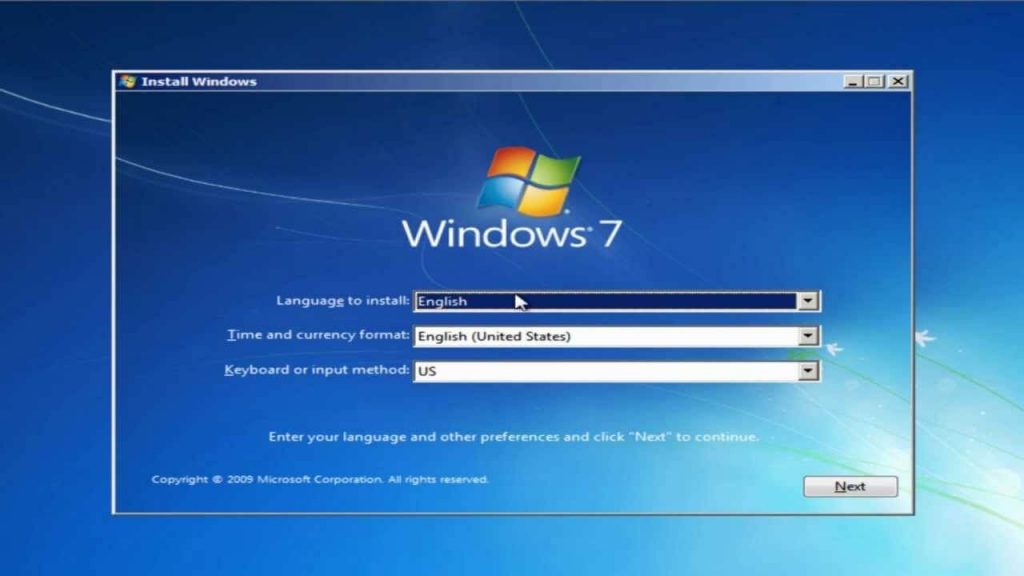
8- It’s time to configure
A window with the Windows 7 interface will appear. Here you need to select the language, country and keyboard language. When you’re done, click Next.
9- Install on pc
Click the Install Now button. After that, you need to wait for a few moments and the new operating system will boot up on your computer. Don’t worry if your computer restarts several times during this process.
Is it a good thing to install Windows 7 now that the developers have withdrawn support for it?
By opting for Windows 7 over its successors, you’re missing out on a lot of new features. Modern interface, support for new programs, voice assistants and system updates. The latter can make your computer vulnerable.