Content Attributes
The advent of 3D printing has revolutionized the manufacturing process by making it simple to materialize abstract concepts. However, 3D printing isn’t as simple as selecting a file, clicking “print,” and taking it from there. Part of the 3D printing process involves breaking down the temporary structures known as “supports” that hold the object in place during the printing phase. In this comprehensive tutorial, you’ll learn when, why, and how to remove supports from your 3D prints.
Why is Support Important in 3D Printing?
To prevent the print from collapsing or distorting, support structures are an integral aspect of 3D printing. Bridges, overhangs, and other complex sections could collapse without proper support. Additionally, supports allow for the printing of objects with intricate shapes that would otherwise be difficult or impossible to create.
When Should You Use Supports?
Your 3D model’s shape will dictate whether or not you need to employ support. Some typical instances in which support is required are as follows:
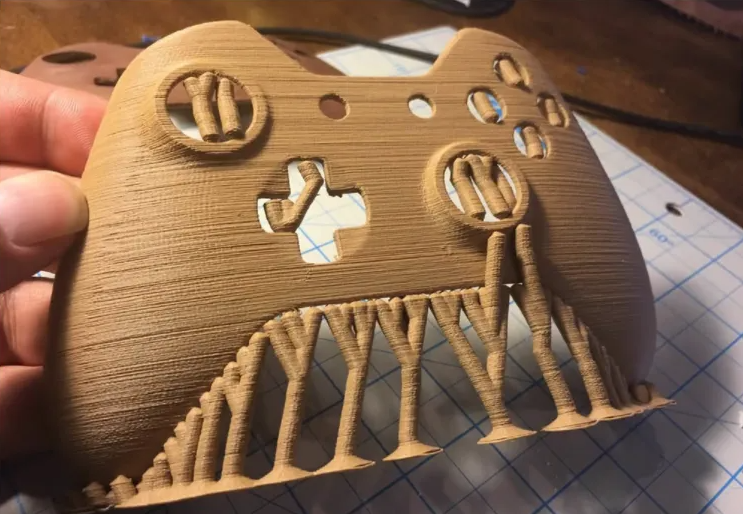
- Overhangs: The printer’s self-supporting angle is approximately 45 degrees, so if your design has any overhangs or horizontal components that are broader than that, you’ll need to include supports. Examples are an arch’s base or a figurine’s arms.
- Bridges: Supports prevent the connection between two points from disintegrating. Without proper reinforcement, a printed bridge could sag or even collapse.
- Complex Designs: Supports can guarantee that even the tiniest details of intricate designs come out perfectly every time.
- Angled Surfaces: Sloped or inclined surfaces that don’t sustain themselves must have supports added to them to prevent distortion.
- Complex Geometry: Objects with complicated, irregular shapes sometimes require support to maintain their form throughout the printing process.
Now that we understand the significance of supports, we can investigate the most effective methods of breaking them.
How Do You Break Support in 3D Printing?
It may take great effort and expertise to break down a support structure. Here is a detailed tutorial on how to destroy 3D-printed support structures:
- 1st Step: Let the 3D print cool down first. Put the 3D print in a cool place once it’s finished printing. The chilling process solidifies the material, making it simple to remove the supports without destroying the print.
- 2nd Step: Look over your strategy to see where the pillars of support are located. Separate the supports from the main model, which are typically thin, lattice-like pieces.
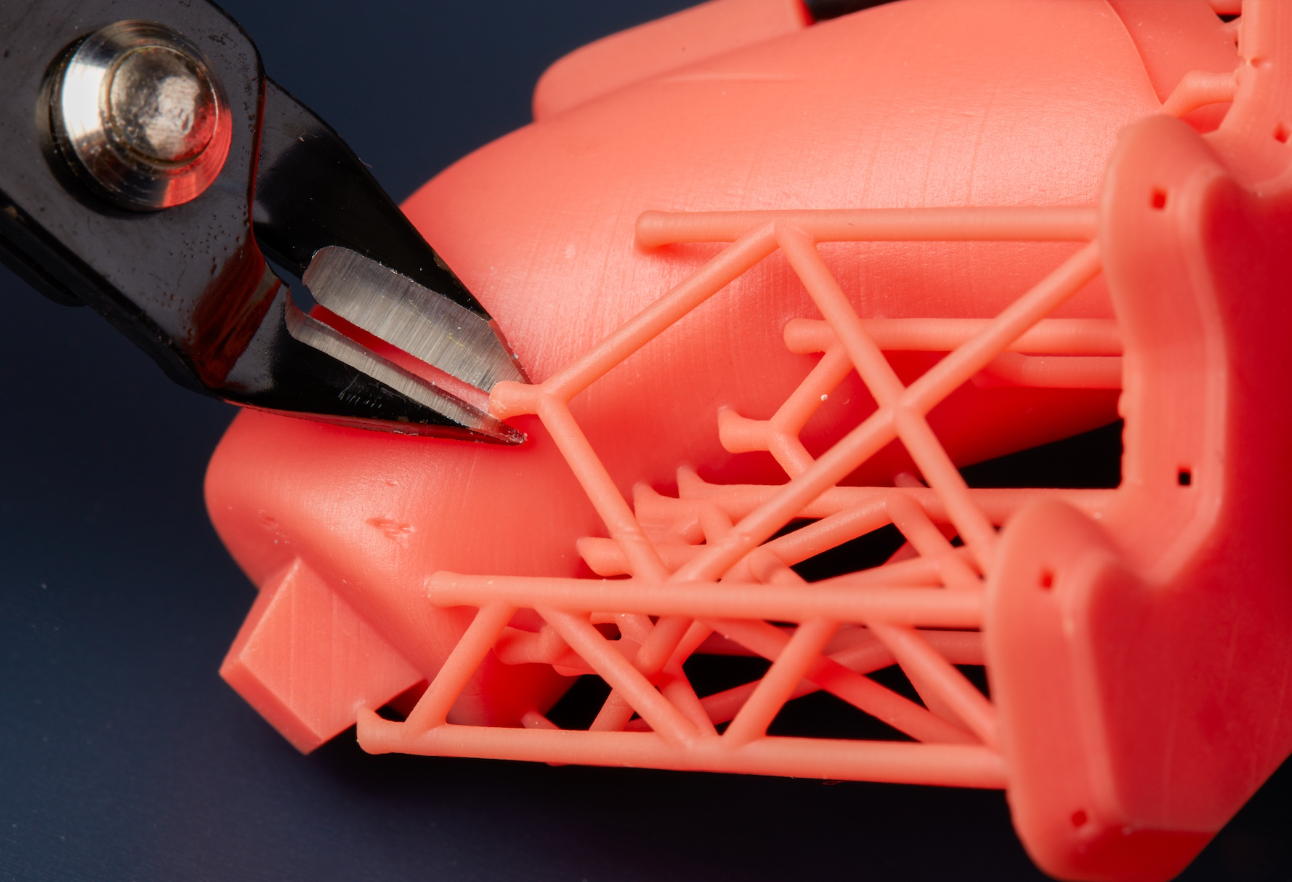
- 3rd Step: Get some tools. You’ll need tools to assist you in removing the supports. The common ones include tweezers, wire cutters, an X-Acto knife, and needle-nose pliers. Depending on the supports and printing medium you employ, you may need specific tools.
- 4th Step: Probe the sturdiness of the supports with your fingers. Use your fingers for a gentler removal if you can take them off swiftly.
- 5th Step: Remove stubborn supports by snatching them with needle-nose pliers or tweezers and gently twisting or pulling them away from the print. If you don’t want to damage the central model, take your time and be gentle when applying pressure.
- Pro tip: To remove the supports, you may need to use wire cutters or an X-Acto knife. Be careful not to accidentally truncate the main text.
- 6th Step: After removing the majority of the supports, you may find that your print still has a few loose parts or rough patches. Remove any imperfections with sandpaper or other finishing equipment.
- 7th Step: Remove any debris or excess adhesive from the support structures by giving your print a good cleaning.
Tools Used for Breaking the Support
With the correct equipment, removing supports from 3D-printed objects may be a breeze. Fans of 3D printing frequently employ the following methods to eliminate the need for support:
- Cutting Mat: Protect your workspace when trimming and working on your prints with a nice cutting mat.
- Avery Glue Stick: To prevent the print from warping or peeling off the heated bed, placing a few pieces of Avery Glue Stick on the bed is a good idea.
- Filing Tool: If your 3D prints have any jagged edges, you can easily smooth them out with a file tool. Use it to make bulky objects easier to handle.
- Knife Clean-Up Kit: This set of knives and its accompanying locking storage case are ideal for tidying up your prints.
- Wire brushes: Wire brushes are great for cleaning the print bed or extruder nozzle of any excess filament or debris.
- Filament Friday pouch: The Filament Friday pouch or other similar zipper bags are perfect for keeping all your 3D printing supplies together and easily accessible.
- Flush cutters: Flush cutters are required for the tidy removal of support structures and excess filament. The blades are thin and flat, allowing for precise cutting that won’t damage your artwork.
- Needle Nose Pliers: To remove obstinate support pieces or additional filament from the hot extruder nozzle, needle nose pliers are a helpful tool.
- Spatula Removal Tool: A tiny, flat-bladed spatula is an excellent tool for carefully pulling 3D prints off the build plate and peeling away adhesive support structures.
- Electronic Digital Calipers: Digital electronic calipers are handy for measuring the diameter and thickness of objects and wires. They are crucial in creating functional and well-fitting models.
Best 3D Printing Software
SelfCAD is one of the best 3D modeling software because of its intuitive interface and powerful features. With SelfCAD, users of any experience level may create 3D models, slice them, and print them. Due to its intuitive design, even inexperienced users may quickly find and use the features they need.
SelfCAD’s 3D modeling features make it simple to create complex models. The software has several tools for sculpting both simple and complex organic forms. After creating your 3D models, you can prepare them for 3D printing using the in-built online slicer of the software, as shown in the video below.
Mastering Support Removal Techniques in 3D Printing
Breaking the supports is a skill necessary for producing high-quality 3D prints. Knowing when and how to utilize supports and the proper approach to remove them can greatly improve the quality of your 3D-printed objects. You can get better at unhooking support by taking your time, being patient, and practicing. As you gain experience, you’ll be able to create patterns with greater complexity and depth.