Content Attributes
If the Toilet Won’t Stop Running, you could be running out of water and resulting in a larger bill for water. There’s no need to fret the issue of a toilet that is running is generally a fixable issue. The three most prevalent reasons are a damaged or dirty flapper an overly long or small of a linkage that runs between the lever for flushing and the flapper or a float that isn’t in its proper position.
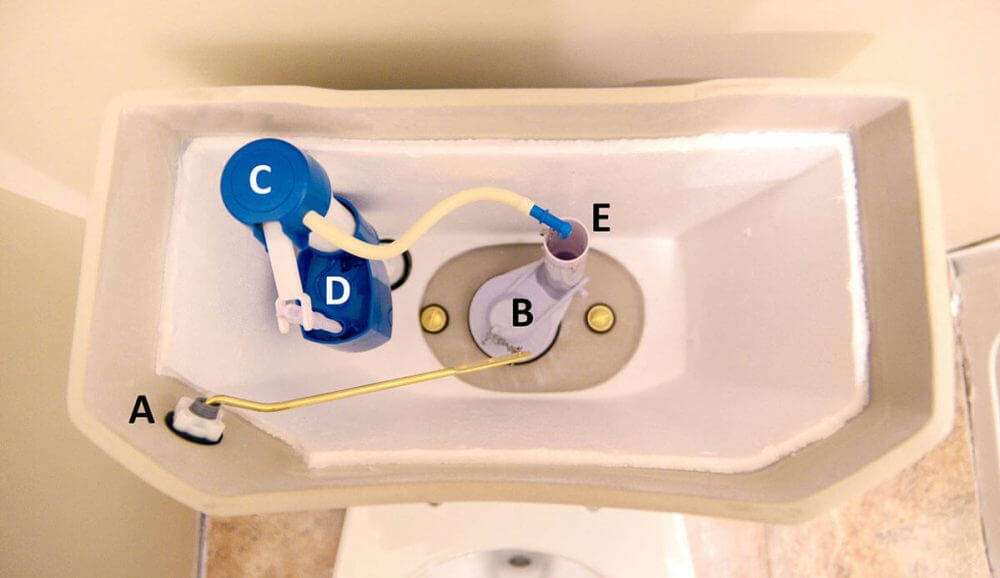
The first thing you’ll have to do is switch off the water that is flowing into the toilet. Find the silver knob at the wall that is behind the toilet, and move it to the left. Then, remove the lid of the tank and begin to recognize all the different components and the ways they all connected.
- The lever to flush the toilet (on the outside) linked to the flapper made of rubber (inside).
- The rubber flapper prevents the tank’s water from getting into the bowl.
- The pump is the one that fills the tank following a flush.
- The float moves up and down as the water levels rise to inform the pump of when to stop.
- The overflow tube determines where the level of water should be within the tank.
Why won’t My Toilet Stop Running?
The Toilet Won’t Stop Running, it is difficult to maintain a steady water level within the bowl and in the tank. The issue could be due to a number of possible causes, like leaky flappers or floating float that isn’t set properly or a malfunctioning fill valve. A lot of these issues can be resolved fairly easily yourself.
Cause 1 – Flapper Chain
The first step is to ensure that your chain is connecting to the flush lever to the flapper made of rubber correctly. Sometimes, the chain may disconnected. Then, move the flush lever around and check if there’s too much or not enough looseness on the chain. If it’s not long enough the water continues to flow into the bowl since the flapper hasn’t been shut off.
This is too long it won’t be able to let the flapper open once the lever has been pulled. If you are required to remove it, cut the chain that isn’t needed. The chain could also have a floating device attached to it. Adjust the float until it rests on the water’s surface.
Cause 2 – Dirty or Broken Flapper
As time passes the flapper could not be able to seal the drain correctly due to its dirtiness damaged, warped, or cracked. If you want for it to clean or replace, first drain the tank. Then remove that chain. The shop will have many options for replacement.
If you are able identify the brand, locate a “universal” label that looks like what you’ve got. After you’ve reattached your flapper, check it with water to check whether it sealed correctly.
If you discover that the valve that flushes (what keeps the flapper in position) could be the source of water leakage and requires replacement, follow these steps-by-step directions.
Cause 3 – Float out of Position
The level of water in the tank determined through an adjustable float. If the float set to low, it causes an ineffective flush. If the float is too high, the water can spill over through the tube of overflow and continue to flow. Find a fill level mark on the inner back of the tank. Then mark the overflow tube, so that it can be easy to see. If you can’t find an indication, measure about 1 inch below the overflow tube, and then draw a line.
After that, turn off the faucet and then flush it, observing the point at which the water level is low with respect with the marking. If the water level is over the mark, then the float that powers the pump is high. Adjust the float down according to the situation. In older toilets you might have to bend the rod that connects to the floating float.
Modern toilets require turning a screw, or move a clip down the road. Sometimes the valve for filling (what connects the float to) isn’t shutting off, and could be malfunctioning. In this instance you’ll need to purchase a replacement valve.
How to handle the situation to take if your Toilet Won’t Stop Running?
- Remove Lid: You will not be able to observe or perform anything until you take off the lid from your toilet. This is the easiest part. Just lift it off the toilet’s upper part and put it in a place away from the way.
- Check the Fill Tube: There are a number of valves and tubes inside your toilet. Locate the fill tube that runs from the tube that is overflow (the one with the open top) and through the valve for fill which is the largest tube that is the second vertical inside your toilet. The tube for filling is small and flexible. Be sure that the fill tube connected to both the fill valve to an overflow tube and is at least one inch lower than the rim of the overflow tube. If not, it could be the cause of your issue. If it does, you’re not sure, proceed and proceed to step 2.
- Check the Fill Height: Every toilet has a float linked to the fill valve. This float might have set to high meaning the water won’t flow. It could also have set to low and the toilet won’t flush efficiently. The water should be at a distance of about an inch from the rim of the overflow tube. If not, alter the floating. When the float persists be an issue then it could be an appropriate time to get a new one available at any hardware retailer.
- Examine the Handle as well as Flapper. If your handle gauge and the fill level are okay, then move to the flapper and handle. If the chain connecting both the handle and flapper are long or gets caught. It won’t be able to close the flapper while the toilet continues to flow. Adjust the chain so that it gives some slack enough to ensure that the flapper shuts, but with the hand not letting it touch the toilet’s lid after flushing. If the adjustment doesn’t work, you might need to replace the flapper. You can find a new one at any hardware retailer.